Using Tags to Mask Data in Snowflake
Snowflake‘s established position as a leading cloud data platform can be attributed to several unique features and advantages it offers. Safeguarding sensitive information is paramount in today’s data-centric world, and Snowflake has risen to the challenge by introducing tags and masking policies. Tags in Snowflake allow users to categorise and label database objects, making it easier to identify and manage specific datasets, whilst masking policies are designed to conceal the original data, displaying only masked values to unauthorised roles, guaranteeing data security.
In conjunction, these two features offer a powerful mechanism: by using tags to identify sensitive data and then employing masking policies, Snowflake users can systematically protect critical information, ensuring that only authorised roles can access the original data. In this blog post, we will go deeper into the creation of masking policies using tags, focusing on the advantages and the constraints of this feature in different working scenarios.

Requirements
- Snowflake Enterprise Edition (or higher)
- Access to an ACCOUNTADMIN role in your Snowflake session
Working Scenario
Let’s imagine there is a sales company called “New Town Shoes” that is using Snowflake to save all their items and customers data. The company has a database called TOWNSHOES_DB where there is a schema called TOWNSHOES_SALES. Inside this schema, there are 2 tables: CUSTOMER (with customer data) and ITEMS (with information about the items they sell). There is also a view named CUSTOMER_100 where they keep the data of the top 100 customers.
The company is working with a third-party consultant, who holds a SYSADMIN role in Snowflake, responsible for creating BI reports. However, the management is concerned about the potential exposure of confidential data within the database, and they have requested their IT manager, holding an ACCOUNTADMIN role in Snowflake, to mask certain data. This measure will enable the consultant to continue their work without accessing sensitive information.
The IT manager decides to create a new role named TAG_MASKING_ADMIN that will allow them to centralise and delegate the responsibility of managing data masking to one of their team members. This role will exclusively manage the masking policies, determining which data segments are considered confidential.
The subsequent sections provide a detailed walkthrough on implementing this security model, ensuring that data is protected whilst still being available for certain roles.
Create A Custom Role for Data Masking Using Tags (TAG_MASKING_ADMIN)
Create A Tag Role
First, we’ll set up a specialised role designed for data tagging, using the USERADMIN role.
However, creating this role isn’t the end of the process; the role requires CREATE and APPLY privileges related to data tagging. To grant these crucial privileges, we’ll employ the ACCOUNTADMIN role as it possesses the required permissions:
USE ROLE USERADMIN; // USING USERADMIN TO CREATE NEW ROLES
CREATE OR REPLACE ROLE TAG_ADMIN; // CREATION OF TAG_ADMIN ROLE THAT WILL BE ABLE TO TAG OBJECTS

USE ROLE ACCOUNTADMIN;
GRANT CREATE TAG ON SCHEMA TOWNSHOES_DB.TOWNSHOES_SALES TO ROLE TAG_ADMIN; //NOTE THAT CREATE TAG PRIVILEGES MUST BE GIVEN IN SCHEMA LEVEL
GRANT APPLY TAG ON ACCOUNT TO ROLE TAG_ADMIN; //NOTE THAT APPLY TAG PRIVILEGES MUST BE GIVEN IN ACCOUNT LEVEL
Create A Data Masking Role
To implement data security using masking policies, we’ll establish a dedicated role with the necessary privileges. By leveraging the USERADMIN role, we can create this new role specifically to manage masking policies. Just as in our previous setup, this role requires both CREATE and APPLY privileges.
To ensure it has the appropriate permissions, we turn back to the ACCOUNTADMIN role:
USE ROLE USERADMIN; // USING USERADMIN TO CREATE NEW ROLES
CREATE OR REPLACE ROLE MASKING_ADMIN; // CREATION OF MASKING_ADMIN ROLE THAT WILL BE ABLE TO APPLY MASKING POLICIES

USE ROLE ACCOUNTADMIN;
GRANT CREATE MASKING POLICY ON SCHEMA TOWNSHOES_DB.TOWNSHOES_SALES TO ROLE MASKING_ADMIN; //NOTE THAT CREATE TAG PRIVILEGES MUST BE GIVEN IN SCHEMA LEVEL

GRANT APPLY MASKING POLICY ON ACCOUNT TO ROLE MASKING_ADMIN; //NOTE THAT APPLY TAG PRIVILEGES MUST BE GIVEN IN ACCOUNT LEVEL
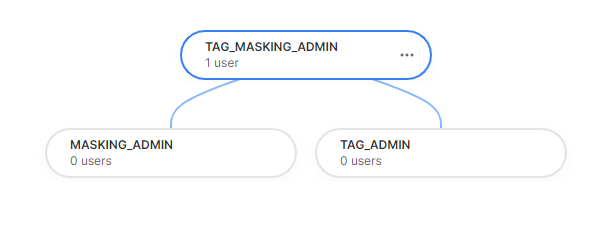
TAG_MASKING_ADMIN Creation (Joining of TAG_ADMIN and MASKING_ADMIN)
To establish a comprehensive role, we are introducing TAG_MASKING_ADMIN. This role combines the privileges from the newly created roles TAG_ADMIN and MASKING_ADMIN. Remember that for TAG_MASKING_ADMIN to function seamlessly, it needs access to all database objects, including schemas, tables, views, warehouses, and more. Additionally, to make this role actionable, it is imperative to grant it to a specific user:
USE ROLE ACCOUNTADMIN;
CREATE OR REPLACE ROLE TAG_MASKING_ADMIN; // CREATION OF THE ROLE

// WE GRANT PRIVILEGES TO THIS ROLE FOR THE DIFFERENT DATABASES, SCHEMAS, TABLES, VIEWS OR WAREHOUSE WHERE WE WILL APPLY THE TAG MASKING POLICIES
GRANT ALL ON DATABASE TOWNSHOES_DB TO ROLE TAG_MASKING_ADMIN;
GRANT ALL ON SCHEMA TOWNSHOES_DB.TOWNSHOES_SALES TO ROLE TAG_MASKING_ADMIN;
GRANT ALL ON TABLE TOWNSHOES_DB. TOWNSHOES_SALES.CUSTOMER TO ROLE TAG_MASKING_ADMIN;
GRANT ALL ON TABLE TOWNSHOES_DB. TOWNSHOES_SALES.ITEM TO ROLE TAG_MASKING_ADMIN;
GRANT ALL ON VIEW TOWNSHOES_DB. TOWNSHOES_SALES.CUSTOMER_100 TO ROLE TAG_MASKING_ADMIN;
GRANT ALL ON WAREHOUSE TOWNSHOES_WH TO ROLE TAG_MASKING_ADMIN; //TOWNSHOES_WH IS THE NAME OF THE WAREHOUSE USED

GRANT ROLE TAG_MASKING_ADMIN TO USER PABLODONIGA; //WE GRANT THIS ROLE TO THE SELECTED USER

// FINALLY, WE GIVE TO TAG_MASKING_ADMIN, THE PRIVILEGES FROM THE 2 PREVIOUS CUSTOM ROLES

USE ROLE ACCOUNTADMIN;
GRANT ROLE TAG_ADMIN TO ROLE TAG_MASKING_ADMIN;
GRANT ROLE MASKING_ADMIN TO ROLE TAG_MASKING_ADMIN;
Creating Tags and Masking Policies
Creating A Tag
In Snowflake, tags are metadata labels that can be applied to various objects (like tables, views, schemas, etc.) to help categorise, manage, and search for these objects more effectively. By using tags, you can quickly identify the purpose, sensitivity, and other characteristics of data objects.
In this case, we are creating a tag named MASKED_COLUMNS_TAG with 1 allowed value:
- SYSADMIN_MASKING: The value that will be used to tag the objects we want to hide from the third-party consultant (with a SYSADMIN role):
USE ROLE TAG_MASKING_ADMIN;

// CREATION OF THE TAG  ‘MASKED_COLUMNS_TAG’
CREATE OR REPLACE TAG TOWNSHOES_DB. TOWNSHOES_SALES.MASKED_COLUMNS_TAG
	ALLOWED_VALUES ‘SYSADMIN_MASKING’;
Note that tags are created inside a schema hierarchy. When working with tags, bear the following points in mind:
- Allowed values cannot be changed or added once the tag has been created (for example, using ALTER TAG). If you want to use new tag values, you must create a whole new tag object.
- To be able to drop a tag, no policies can be associated with that tag.
Creating A Masking Policy
Masking policies are dynamic data masking tools that protect sensitive data, automatically transforming data when queried, ensuring that unauthorised users see obfuscated or masked values instead of the actual data. This powerful feature enhances data security without modifying stored data.
A limitation is that a single policy can only be applied to one datatype. For example, in this case we’ll create a masking policy for string values, named STRING_DATA_MASK:
// CREATION OF THE MASKING POLICY FOR STRINGS

CREATE OR REPLACE MASKING POLICY TOWNSHOES_DB. TOWNSHOES_SALES.STRING_DATA_MASK AS (VAL STRING) RETURNS STRING ->
	CASE
		WHEN CURRENT_ROLE() NOT IN (‘TAG_MASKING_ADMIN’) THEN ‘***MASKED***’
	ELSE VAL
END;
When this masking policy is applied to an object, the string values of that object will be shown as ***MASKED*** if the role performing the query is not TAG_MASKING_ADMIN.
Adding the Masking Policy to A Tag
Finally, we’ll apply a masking policy to a tag, so that all objects that are tagged with a specific value are automatically subjected to the masking policy. Let’s use the following code:
// CREATION OF THE MASKING POLICY FOR STRINGS


ALTER TAG TOWNSHOES_DB. TOWNSHOES_SALES.MASKED_COLUMNS_TAG SET

MASKING POLICY TOWNSHOES_DB. TOWNSHOES_SALES. STRING_DATA_MASK;
Now, all objects tagged with some of the allowed values of the STRING_DATA_MASK tag (SYSADMIN_MASKING or DATES) will automatically be included in the masking policy.
Working Scenarios Using Tags and Masking Policies
Tagging A Full Schema
After creating the TAG_MASKING_ADMIN role, the company IT manager wants to check if tagging the TOWNSHOES_SALES schema will prevent the SYSADMIN account from visualising the data.
As they have already linked the masking policy to a tag, they only need to tag the objects (in this case the schema) to apply the masking policy. In this scenario, they’ll tag the schema with the value SYSADMIN_MASKING:
USE ROLE TAG_MASKING_ADMIN;

// WE ADD THE TAG ‘SYSADMIN_MASKING’ TO THE SCHEMA ‘TOWNSHOES_SALES’
ALTER SCHEMA TOWNSHOES_SALES SET TAG
TOWNSHOES_DB. TOWNSHOES_SALES.MASKED_COLUMNS_TAG = ‘SYSADMIN_MASKING’;


// NOW WE CAN DO SOME QUERIES TO THE OBJECTS INSIDE THE SCHEMA, AND WE CAN SEE THAT USING THIS ROLE, ALL VALUES ARE SHOWN.
SELECT * FROM TOWNSHOES_DB. TOWNSHOES_SALES.CUSTOMER;
SELECT * FROM TOWNSHOES_DB. TOWNSHOES_SALES.ITEM;
SELECT * FROM TOWNSHOES_DB. TOWNSHOES_SALES.CUSTOMER_100;

// NOW WE DO THE SAME BUT USING THE SYSADMIN ROLE, AND WE CAN SEE THAT THE DATA IS SHOWN MASKED

USE ROLE SYSADMIN;
SELECT * FROM TOWNSHOES_DB. TOWNSHOES_SALES.CUSTOMER;
SELECT * FROM TOWNSHOES_DB. TOWNSHOES_SALES.ITEM;
SELECT * FROM TOWNSHOES_DB. TOWNSHOES_SALES.CUSTOMER_100;
This is how the CUSTOMER table appears for the SYSADMIN role:

As we can see, all the values from objects inside the schema (tables and views) show masked data for the SYSADMIN role. It is important to note that only the columns with string datatype are masked, as the masking policy we previously created was applied only to strings.
Now let’s imagine that the IT manager wants to untag the ITEM table from the tagged schema, while all other objects (except the ITEM table) continue to be affected by the masking policy:
USE ROLE TAG_MASKING_ADMIN;

// WE ADD THE TAG ‘SYSADMIN_MASKING’ TO THE SCHEMA ‘TOWNSHOES_SALES’
ALTER SCHEMA TOWNSHOES_SALES SET TAG
TOWNSHOES_DB. TOWNSHOES_SALES.MASKED_COLUMNS_TAG = ‘SYSADMIN_MASKING’;

// NOW WE ‘UNTAG’ THE ITEM TABLE
ALTER TABLE TAG TOWNSHOES_DB. TOWNSHOES_SALES.ITEM UNSET TAG
TOWNSHOES_DB. TOWNSHOES_SALES.MASKED_COLUMNS_TAG;


// NOW WE CAN DO SOME QUERIES TO THE OBJECTS INSIDE THE SCHEMA, AND WE CAN SEE THAT USING THIS ROLE, ALL VALUES ARE SHOWN.
SELECT * FROM TOWNSHOES_DB. TOWNSHOES_SALES.CUSTOMER;
SELECT * FROM TOWNSHOES_DB. TOWNSHOES_SALES.ITEM;
SELECT * FROM TOWNSHOES_DB. TOWNSHOES_SALES.CUSTOMER_100;

// NOW WE DO THE SAME BUT USING THE SYSADMIN ROLE, AND WE CAN SEE THAT THE DATA IS SHOWN MASKED

USE ROLE SYSADMIN;
SELECT * FROM TOWNSHOES_DB. TOWNSHOES_SALES.CUSTOMER;
SELECT * FROM TOWNSHOES_DB. TOWNSHOES_SALES.ITEM;
SELECT * FROM TOWNSHOES_DB. TOWNSHOES_SALES.CUSTOMER_100;
The result from querying the ITEM table using the SYSADMIN role will look like this:
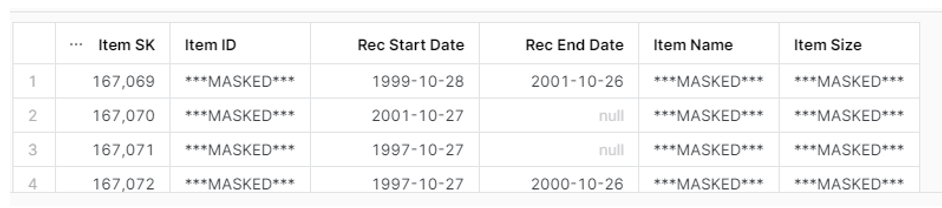
As we can see, even though the tag was removed from the table, because the schema itself is still tagged, all objects within the schema continue to be governed by the masking policy. This occurs despite the ‘unset’ command having been applied to the individual table, so if we want specific tables or views within a schema to adhere to a particular masking policy, we should apply individual tags directly to those objects.
Also notice that, as before, only the string values from the ITEM table are masked.
Tagging Tables and Views
As we have just seen, if we want to tag specific tables or views, we must do so one by one. The code used to tag these objects is very similar to the schema. In our scenario, the IT manager only wants to mask data from the CUSTOMER table and the CUSTOMER_100 view, and they use this code:
USE ROLE TAG_MASKING_ADMIN;

// WE ADD THE TAG ‘SYSADMIN_MASKING’ TO THE TABLE CUSTOMER
ALTER TABLE TOWNSHOES_DB. TOWNSHOES_SALES.CUSTOMER SET TAG
TOWNSHOES_DB. TOWNSHOES_SALES.MASKED_COLUMNS_TAG = ‘SYSADMIN_MASKING’;

// WE ADD THE TAG ‘SYSADMIN_MASKING’ TO THE VIEW CUSTOMER_100
ALTER VIEW TOWNSHOES_DB. TOWNSHOES_SALES.CUSTOMER_100 SET TAG
TOWNSHOES_DB. TOWNSHOES_SALES.MASKED_COLUMNS_TAG = ‘SYSADMIN_MASKING’;


// NOW WE CAN DO SOME QUERIES TO THE OBJECTS, AND WE CAN SEE THAT USING THIS ROLE, ALL VALUES ARE SHOWN.
SELECT * FROM TOWNSHOES_DB. TOWNSHOES_SALES.CUSTOMER;
SELECT * FROM TOWNSHOES_DB. TOWNSHOES_SALES.CUSTOMER_100;

// NOW WE DO THE SAME BUT USING THE SYSADMIN ROLE, AND WE CAN SEE THAT THE DATA IS SHOWN MASKED

USE ROLE SYSADMIN;
SELECT * FROM TOWNSHOES_DB. TOWNSHOES_SALES.CUSTOMER;
SELECT * FROM TOWNSHOES_DB. TOWNSHOES_SALES.CUSTOMER_100;
The results from querying the CUSTOMER table using the SYSADMIN role:
Tagging Specific Columns from A Table
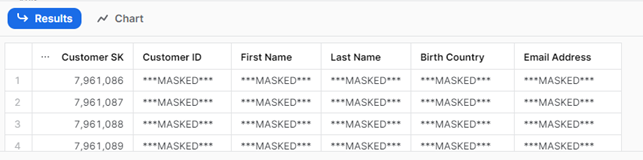
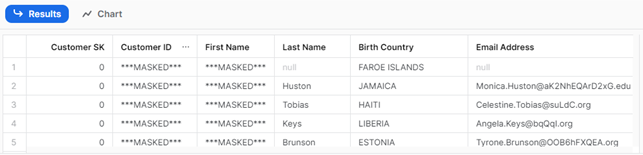
Now the IT manager wants to mask the Customer ID, First Name and Customer SK columns from the CUSTOMER table. To tag specific columns, the following code can be used:
USE ROLE TAG_MASKING_ADMIN;

// WE ADD THE TAG ‘SYSADMIN_MASKING’ TO THE CUSTOMER_ID, FIRST NAME AND CUSTOMER SK COLUMNS
ALTER TABLE TOWNSHOES_DB. TOWNSHOES_SALES.CUSTOMER MODIFY COLUMN ‘Customer ID’
SET TAG TOWNSHOES_DB. TOWNSHOES_SALES.MASKED_COLUMNS_TAG = ‘SYSADMIN_MASKING’;

ALTER TABLE TOWNSHOES_DB. TOWNSHOES_SALES.CUSTOMER MODIFY COLUMN ‘First Name’
SET TAG TOWNSHOES_DB. TOWNSHOES_SALES.MASKED_COLUMNS_TAG = ‘SYSADMIN_MASKING’;

ALTER TABLE TOWNSHOES_DB. TOWNSHOES_SALES.CUSTOMER MODIFY COLUMN ‘Customer SK’
SET TAG TOWNSHOES_DB. TOWNSHOES_SALES.MASKED_COLUMNS_TAG = ‘SYSADMIN_MASKING’;

// NOW WE CAN QUERY THE TABLE
SELECT * FROM TOWNSHOES_DB. TOWNSHOES_SALES.CUSTOMER;

// NOW WE DO THE SAME BUT USING THE SYSADMIN ROLE

USE ROLE SYSADMIN;
SELECT * FROM TOWNSHOES_DB. TOWNSHOES_SALES.CUSTOMER;
The results from querying the CUSTOMER table using the SYSADMIN role are now like this:
As we can see, only two of the tagged columns are masked (as expected). Even though the Customer SK column has been tagged, it’s still showing values because its datatype is not a string, so it doesn’t meet the requirements of the masking policy.
Adding Different Masking Policies to A Tag
As we have just observed, only one datatype can be applied under a masking policy. To mask other datatypes using the same tag, we need to establish a new masking policy for each one. In this instance, the company IT manager intends to create a new policy for numbers, enabling them to mask the Customer SK column that could not be masked previously:
USE ROLE TAG_MASKING_ADMIN;

// WE CREATE A NUMERIC MASK POLICY
CREATE OR REPLACE MASKING POLICY TOWNSHOES_DB. TOWNSHOES_SALES.NUMERIC_DATA_MASK AS (VAL NUMBER) RETURNS NUMBER ->
	CASE
		WHEN CURRENT_ROLE() NOT IN (‘TAG_MASKING_ADMIN’) THEN 0
	ELSE VAL
END;

// WE ADD THIS POLICY TO THE MASKED_COLUMNS_TAG
ALTER TAG TOWNSHOES_DB. TOWNSHOES_SALES.MASKED_COLUMNS_TAG SET
MASKING POLICY TOWNSHOES_DB. TOWNSHOES_SALES. NUMERIC_DATA_MASK;

// NOTICE THAT IN THIS POINT WE HAVE 2 MASKING POLICIES (STRING_DATA_MASK AND NUMERIC_DATA_MASK) APPLIED TO THE TAG MASKED_COLUMNS_TAG

// NOW WE TAG THE DESIRED COLUMNS AS WE DID IN THE PREVIOUS SCENARIO

// WE ADD THE TAG ‘SYSADMIN_MASKING’ TO THE CUSTOMER_ID, FIRST NAME AND CUSTOMER SK COLUMNS
ALTER TABLE TOWNSHOES_DB. TOWNSHOES_SALES.CUSTOMER MODIFY COLUMN ‘Customer ID’
SET TAG TOWNSHOES_DB. TOWNSHOES_SALES.MASKED_COLUMNS_TAG = ‘SYSADMIN_MASKING’;

ALTER TABLE TOWNSHOES_DB. TOWNSHOES_SALES.CUSTOMER MODIFY COLUMN ‘First Name’
SET TAG TOWNSHOES_DB. TOWNSHOES_SALES.MASKED_COLUMNS_TAG = ‘SYSADMIN_MASKING’;

ALTER TABLE TOWNSHOES_DB. TOWNSHOES_SALES.CUSTOMER MODIFY COLUMN ‘Customer SK’
SET TAG TOWNSHOES_DB. TOWNSHOES_SALES.MASKED_COLUMNS_TAG = ‘SYSADMIN_MASKING’;

// NOW WE CAN QUERY THE TABLE
SELECT * FROM TOWNSHOES_DB. TOWNSHOES_SALES.CUSTOMER;

// NOW WE DO THE SAME BUT USING THE SYSADMIN ROLE

USE ROLE SYSADMIN;
SELECT * FROM TOWNSHOES_DB. TOWNSHOES_SALES.CUSTOMER;
Let’s check the results of the query:
Now all the columns have masked values (string and numeric columns). It is important to notice that when creating a masking policy, the masked value must match the datatype of the column. For example, in this scenario, the Customer SK column has been masked with the numeric value ‘0’ as we are not allowed to use a string value, for example ***MASKED***, for that column. This could be confusing for some new users, who might believe that the masked value represents an actual number. Remember that a tag can support only one masking policy for each datatype!
Creating A Masking Policy Using the SHA2 Function
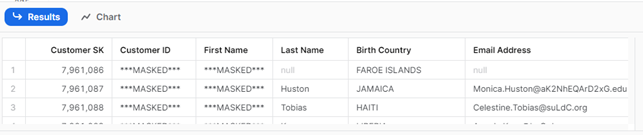
In this scenario, the third-party BI consultant working with New Town Shoes reports that they are unable to create any charts, as all data is masked with the same value. Consequently, the IT manager decides to create a masking policy using the SHA2 function, which generates a hex-encoded string for every different value, so the proportions of the data remain the same. In this case, they will set up a new masking policy using the SHA2 function, then apply it to the Birth Country column:
USE ROLE TAG_MASKING_ADMIN;

// WE CREATE THE NEW MASK POLICY USING SHA2 FUNCTION
CREATE OR REPLACE MASKING POLICY TOWNSHOES_DB. TOWNSHOES_SALES.SHA2_STRING_DATA_MASK AS (VAL STRING) RETURNS STRING ->
	CASE
		WHEN CURRENT_ROLE() NOT IN (‘TAG_MASKING_ADMIN’) THEN SHA2(VAL)
	ELSE VAL
END;

// WE ADD THIS POLICY TO THE MASKED_COLUMNS_TAG
ALTER TAG TOWNSHOES_DB. TOWNSHOES_SALES.MASKED_COLUMNS_TAG SET
MASKING POLICY TOWNSHOES_DB. TOWNSHOES_SALES SHA2_STRING_DATA_MASK;

// NOW WE TAG THE COLUMN “BIRTH COUNTRY” AS WE NEED IN THIS SCENARIO

// WE ADD THE TAG ‘SYSADMIN_MASKING’ TO THE CUSTOMER_ID, FIRST NAME AND CUSTOMER SK COLUMNS
ALTER TABLE TOWNSHOES_DB. TOWNSHOES_SALES.CUSTOMER MODIFY COLUMN ‘Birth Country’
SET TAG TOWNSHOES_DB. TOWNSHOES_SALES.MASKED_COLUMNS_TAG = ‘SYSADMIN_MASKING’;

// NOW WE CAN QUERY THE TABLE
SELECT * FROM TOWNSHOES_DB. TOWNSHOES_SALES.CUSTOMER;

// NOW WE DO THE SAME BUT USING THE SYSADMIN ROLE

USE ROLE SYSADMIN;
SELECT * FROM TOWNSHOES_DB. TOWNSHOES_SALES.CUSTOMER;
The result of the query executed as SYSADMIN will look like this:
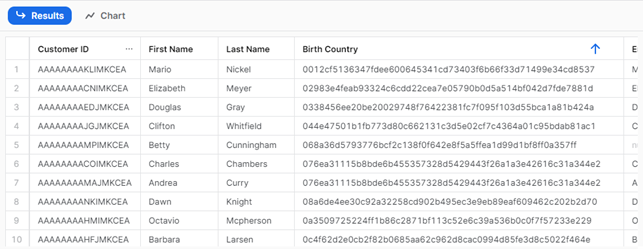
We can see that every country has a different hex code, so now the BI consultant can build some charts even though the data is still hidden.
Other Important Functions
Unset Tags and Unset Masking Policies from Tags
As mentioned before, only one masking policy for the same datatype can be assigned to the same tag:
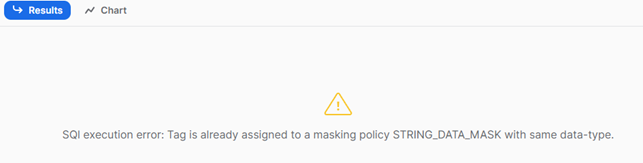
So, if we wish to replace or modify the existing masking policy, we must first remove the masking policy from the tag. The code would look like this:
// TO UNSET A MASK POLICY FROM
ALTER TAG TOWNSHOES_DB.TOWNSHOES_SALES.MASKED_COLUMNS_TAG
UNSET MASKING POLICY TOWNSHOES_DB.TOWNSHOES_SALES.SHA2_STRING_MASK;
To unset a tag from different database objects, we can use the following code:
// TO UNSET A SCHEMA
ALTER SCHEMA TOWNSHOES_DB. TOWNSHOES_SALES
UNSET TAG TOWNSHOES_DB. TOWNSHOES_SALES.MASKED_COLUMNS_TAG;

// TO UNSET A TABLE
ALTER TABLE TOWNSHOES_DB. TOWNSHOES_SALES.CUSTOMER
UNSET TAG TOWNSHOES_DB. TOWNSHOES_SALES.MASKED_COLUMNS_TAG;

// TO UNSET A COLUMN FROM A TABLE
ALTER TABLE TOWNSHOES_DB. TOWNSHOES_SALES.CUSTOMER MODIFY COLUMN ‘Birth Country’
UNSET TAG TOWNSHOES_DB. TOWNSHOES_SALES.MASKED_COLUMNS_TAG;

// NOTICE THAT FOR UNSET WE DO NOT NEED TO SELECT THE “ALLOWED VALUE” FROM THE TAG
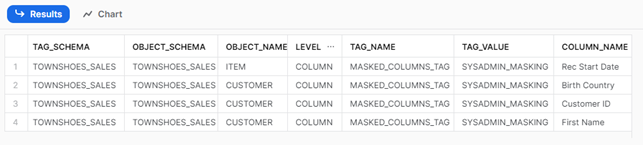
Check Tags and Masking Policies on Objects
To check which objects from a database have been tagged, we can use the TAG_REFERENCES_WITH_LINEAGE:
USE ROLE ACCOUNTADMIN;
SELECT      // USE SELECT * TO GET EVEN MORE INFORMATION FROM TAGS
    TAG_SCHEMA,
    OBJECT_SCHEMA,
    OBJECT_NAME,
    LEVEL,
    TAG_NAME,
    TAG_VALUE,
    COLUMN_NAME
FROM
    TABLE(      SNOWFLAKE.ACCOUNT_USAGE.TAG_REFERENCES_WITH_LINEAGE('TOWNSHOES_DB.TOWNSHOES_SALES.MASKED_COLUMNS_TAG')
    );
To verify the masking policies applied to an object, we can use the POLICY_PREFERENCES function. It is important to note that this function is applicable only at the table, external table, view, or account level. This level must be defined in ref_entity_domain. In this example, we look for the masking policies on the CUSTOMER table:
USE ROLE TAG_MASKING_ADMIN;
SELECT *
FROM TABLE (TOWNSHOES_DB.INFORMATION_SCHEMA.POLICY_REFERENCES(
  REF_ENTITY_DOMAIN => 'TABLE',
  REF_ENTITY_NAME => 'TOWNSHOES_DB.TOWNSHOES_SALES.CUSTOMER' )
);
We get the following results:

Conclusion
The combination of tags and masking policies in Snowflake provides a robust solution for enhancing compliance with data privacy regulations. This effective combination facilitates the easy classification of data according to its sensitivity, enabling organisations to manage and govern their data efficiently. What’s more, masking policies can be applied to various database objects, including schemas, tables, views, and even specific columns, offering granular control over data protection.
Whilst there are certain inconveniences to consider, such as the need for meticulous policy configuration, permitting only one datatype per masking policy, or limited masked value options for specific datatypes such as numeric or dates, the advantages are significant, presenting a comprehensive approach to data security, governance, and regulatory compliance within the Snowflake platform.
In summary, leveraging tags and masking policies in Snowflake enhances data management, security, and compliance for organisations, enabling them to confidently protect sensitive data, implement effective access controls, and easily meet regulatory requirements. If you’d like further information or wish to see how these solutions can be tailored to your specific needs, please contact our team of certified experts.