Azure Private DNS on–premises
Our typical customers at synvert are high-growth scale-ups to large enterprises and corporate companies. We help them increase their team performance and support cloud strategy and implementation. As part of our quest, we commonly work with hybrid cloud setups where on-premises need to co-exist and interact with public cloud providers. In this article, we’ll walk you through one common use case with Azure Private DNS.
Using Azure Private DNS to give access to private resources
Azure Private DNS is a service that gives you an easy and secure solution to register your private DNS records for all your infrastructure elements inside Azure. But how does Azure Private DNS work? First, you need to create your private DNS zone and link it within a Virtual Network. The private DNS zone is a resource where you will place the records and link to a Virtual Network.
You can find all the information about the benefits, capabilities, prices, and so on here, on the Azure Documentation web page.
But what to do if giving domain resolution only for your cloud services is not enough? Most of the time, not all your network components, like servers or employees’ computers are on the cloud network scope, being on-premise or at your employee’s home. So what to do if these elements need access to those DNS records as well?
1. Let’s set up a VPN
To give make those resources accessible to your Azure Private DNS solution, we need to ensure that they have access to the Azure network somehow. To do that, let’s start to set up a VPN solution, using a virtual machine with a Unix-based operating system installed. To easily install an OpenVPN Server, we suggest angristan OpenVPN installer that you can find here and counts with more than 6.9k stars.
2. Configure your VPN
Now that we have a working VPN solution, there are some configurations that you need to do, to ensure that your clients can use your Azure Private DNS on-premises. These configurations are to:
- users are using your DNS when they are connected to the VPN
- DNS requests are forwarded from your VPN machine to the private DNS
On MacOS and Windows clients you only need to add the following line to your VPN server config.
push “dhcp-option DNS <internal-vpn-server-ip>”On Linux clients, apart from the configuration above, make sure to add the next three lines on the client VPN file, because resolve.conf will be edited, and a refresh must be done.
script-security 2
up /etc/openvpn/update-resolv-conf
down /etc/openvpn/update-resolv-conf
3. Add a DNS forwarder
With those changes, the first two phases are done, so let’s continue to the next one. As mentioned on Azure docs, to use this DNS service on-premises, we have to somehow forward our on-premises machine’s DNS requests that are arriving at the VPN server to the Azure Private DNS. To do that, we implemented a DNS server (bind9) that is working only to cache and forward DNS requests.
acl vpn {
	<vpn-network>/24;
};
options {
    directory "/var/cache/bind";
    listen-on port 53 { <vpn-interface-ipv4>; };
    listen-on-v6 { <vpn-interface-ipv6>; };
    forwarders { 168.63.129.16; };
    forward only;
    recursion yes;
    allow-query { vpn; };
    dnssec-enable yes;
    dnssec-validation yes;
    auth-nxdomain no;    # conform to RFC1035
};
As you can see, there are several configurations that you need to do on the bind9 service. First, for security reasons, we created an ACL, called VPN with our VPN network to have better control over who can access the name server. Next, let’s enable bind9 service only on the VPN interface. This way, we implemented another layer of security, because port 53 will be listening only on that interface. If you are using IPv6, make sure that you include it too.
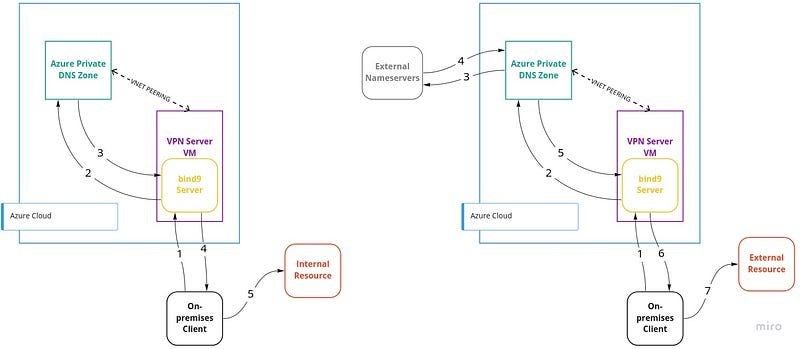
As for our forwarders, we set 168.63.129.16, a virtual public IP address that is used to facilitate a communication channel to Azure platform resources. With that forwarder, and with a virtual network link between our VPN machine virtual network and our Private DNS Zone (image below), we are ensuring that DNS requests are being made to our private DNS too.

Last but not least, let’s use our ACL created previously, on the allow-query section to ensure that only requests from our VPN network are accepted.
And it’s done, now you are able to resolve your private domains on-prem!